Register 3T to 7T anatomical scans
Ali Al-Radaideh

Let us call the 3T MPRAGE set01.hdr and the 7T MPRAGE
set02.hdr.
A. Crop and Rotate
- Open set01 in MRIcro. It is in the sagittal plane.
- Select File / Save as [rotate/clip/format/4D->3D]. You will see
the following window
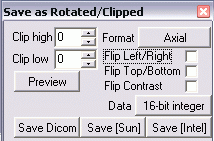
- Click to the right of Format and select Sagittal-left.
- Tick Flip Left/Right.
- Increase the Clip low value until you see a red line reach the
C1 vertebra.
- Increase the Clip high value until the red line is just above the
vertex.
- Click Save [Intel] and save the data with a file name such as
set01_axial_crop and exit from this window.
B. Set Origin
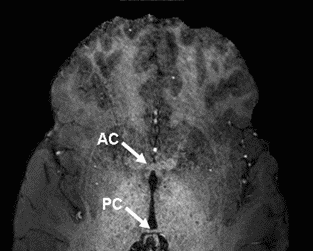
- Re-open set01_axial_crop in MRIcro and scroll through the
slices until you see the anterior commissure, see below.
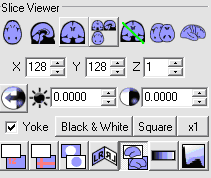
- In the Slice Viewer portion of MRIcro, select the View Projection
icon which will display the image volume in three orthogonal planes, as follows
- Select the Crossbars option and click on the Anterior Commissure (AC),
ensuring the location is correct in all three planes.
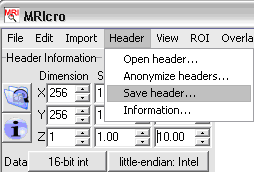
- Note the X, Y, Z voxel coordinate, and type them into the Origin (vxl)
location in MRIcro, near the top left of the window.
- Select Header / Save header and answer Yes.
C. Brain Extraction
- Start FSL and select BET Brain Extraction.
Input Image = set01_axial_crop.hdr
The output image will be given a new name automatically, e.g.,
set01_axial_crop_brain.hdr
- Select Advanced Options and change the 'Fractional Intensity' and
'Threshold gradient' value as below, then click Apply. Open the new image
set01_axial_crop_brain in MRIcro and check the border of brain.
If it is fine go back to BET window and click OK.
If the border of brain is not ideal, modify the 'Fractional Intensity' value.
Note: Fractional intensity values between 0.15-0.25 and Threshold of 0 work well
on these scans.
The 3T MPRAGE scan, in the shape of set01_axial_crop_brain
is now ready for registration.
The 7T MPRAGE scan was acquired as an axial and already has limited head-feet
coverage. Repeat steps B and C, above, on the 7T data to produce
set02_brain.
D. Registration using FSL
- Start FLIRT Linear Registration.
- Set the Reference image to be set02_brain.
- Set the Input image to be set01_axial_crop_brain.
- Set the output image filename. One way to do this quickly is to select the
input image again, and then edit the filename to,
e.g., set01_reg_to_set02
- Select the Model/DOF setting. 7 parameters should be suitable if
registrering images from the same subject on the same scanner, but when
registering between 3T and 7T, it seems that 9 or 12 parameters are required.
Click Go.
- The regsitered image will be created in the same directory as the 7T
reference image.
E. Display the Results
- Open the original 7T MPRAGE (set02_brain) in MRIcro.
- Start a second MRIcro and in this, open the registered 3T image
(set01_reg_to_set02).
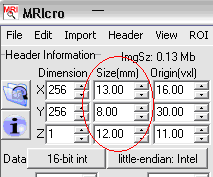
- Ensure that there are no minus signs in the Size(mm) column (if
there is, delete it and select Header / Save header and overwrite the
existing header).
- Tick the Yoke option and select the Cross Hair option in
both MRIcro windows, as follows
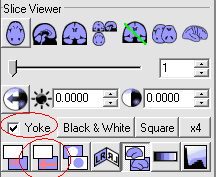
- Click on various anatomical points on one image and visually check their
correspondence in the other image.