Image Browser for X Windows

Graphical viewer to display a range of medical image formats.
Run from UNIX command line with the command
ibx &
assuming that
Paul's bin directory is in the PATH. Also see
environment variable settings for xview.
The main window starts minimised.
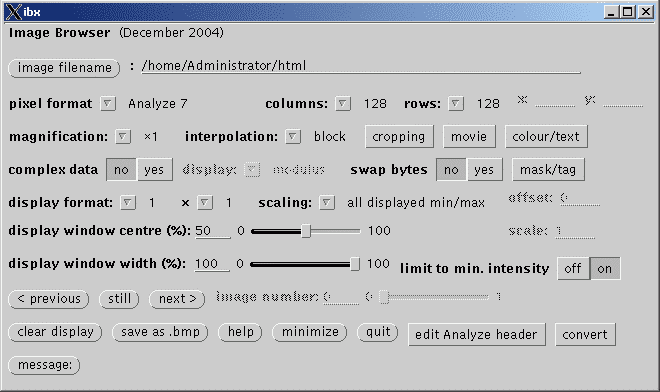
To view images, first select the image by clicking on the image
filename button and browse to the appropriate file. Once selected, on
the next line check that the file format is correct. If not,
select a new file format by right clicking. Now click on the still
button to display the image. Scroll through images in the file using the
<previous and next> buttons or drag the
image number slider to the right. Adjust the displayed
intensities using the display window centre and display
window width sliders. Click on the edit Analyze header
button to open a new window containing some basic image parameters from the
image header, whether an actual Analyze file or not. Click on the image to
display the actual pixel intensity at that point (scaled value displayed in
parentheses if a scaling factor is set). For more details on the
various options, see below.
- image filename
- Click on the image filename button to graphically browse
for the file to load, or type the filename to the right. For formats consisting
of pairs of files, either file may be selected (e.g., .img or .hdr,
.rec or .par). Note, the full list of filenames may not be displayed over some
versions of NFS. In this case, the filename will have to by typed in manually.
Characters such as . and ~ should be
interpreted correctly.
- pixel format
-
Right-click to select the file format. The first eight items are generic pixels
formats followed by specific image file formats. Some formats are better
supported than others. In particular, compressed DICOM files can not be
read and the GE Genesis and Siemens IMA formats are likely to be very version
specific. Bruker images are assumed to be stored in the standard directory
structure; select the '2dseq' file to view images. Philips PAR/REC format may
contain more than one image type
(e.g., real and imaginary multi-echo acquisitions). In this case,
only the first acquisition in the file will be displayed and the total number of
images in the file may be displayed incorrectly. To view all the
images, first convert the PAR/REC files to Analyze (using
ptoa or
MRIcro with the
Calibrate scaling [Philips data only] option selected under
Etc / Options) and then view the converted Analyze files.
Microsoft bitmap format images are only displayed in greyscale. The NIFTI
format may or may not be available depending on the compiler used to build the
program; the same holds for whether gzip compressed NIFTI and Analyze files may
be read. To attempt to read a gzipped Analyze file, always select the NIFTI
format.
- columns
-
Number of columns in image. Must be selected manually for generic pixel formats
else will be set automatically on loading an image of a specific format.
If the value is a power of two it may be selected by right clicking to
display the pull-down menu. For non-powers of two, select x
from the pull-down menu and enter the actual value in the x:
field to the right.
- rows
-
Number of rows in image, as above.
- magnification
-
Sets the displayed image size relative to the actual image size. For
magnifications greater than 1, select block to display the
images in an uninterpolated form, or linear to select linear
interpolation of magnified images which provides a smoother result. This only
affects the displayed image; cropping options and images written as Windows
bitmaps still relate to the unmagnified dimensions.
- cropping
-
Opens the cropping subwindow, to allow access to
controls to crop the displayed and saved images, as well as apply a byte
offset and skip regular numbers of images.
- movie
-
Opens the movie subwindow, which provides crude
controls to play images in the file in a cine loop.
- colour/text
-
Opens the colour/text subwindow. This allows
selection of intensity colour scales as well as text and intensity bar overlays
for the image.
- complex data
-
If set to yes then assumes that the image data is in complex
format. The actual file format will depend on the pixel format
selected, above. Not all formats support complex data. Unless defined otherwise
by a specific file format, complext data is assumed to be stored in pairs of
real and imaginary values for each pixel in turn.
The representation of complex data displayed is controlled by
the following option which may be set to modulus, phase, real, or imaginary. If
only real and imaginary data is present in the file, the modulus and phase
data will be constructed when the images are loaded. This option is not very
robust - use with caution.
- swap bytes
-
The byte order of image data in a file is either defined by the file format, or
in the case of raw data (bytes, shorts, etc.) is assumed to always be
big endian. To force the opposite byte ordering for both defined file formats
or raw data, set this option to yes.